Writing a photo gallery Web Service from scratch with Node.JS and Dropbox with production deployment on Heroku
by Ruben Rincon Nov 2017
In this step by step tutorial we will build a production-ready photo gallery Web Service using Node.JS and Dropbox. It will show you the artifacts needed to implement a Web Service (which we will also call middleware) that authenticates a user via OAuth with Dropbox to read a user folder, nicely display images in a photo gallery and deploy the code on Heroku for production.
These are the main technologies and concepts we will cover:
- Node.JS
- Express
- Front end and back end
- Dropbox API
- OAuth authentication
- Cookies and sessions
- Heroku
- Heroku addins
- Security on Node.JS
The Web Service will allow users to nicely display on a gallery images stored in a Dropbox folder of their own account. To do this, users will first authenticate to Dropbox via OAuth, then the middleware will fetch a number of images from a specific folder and render them using a JavaScript library called Galleria.
Dropbox API has two types of permissions, Full Dropbox access or Folder access. For the sake of security (and your trust), we are only using the second (Folder access), so the middleware is only allowed to read/write to a specific folder on the users Dropbox account and nothing else.
1. Node.JS and Express
The great thing with Node is that you can write server code using JavaScript. Nonetheless, the Web Service needs some structure and a separation of the back end and the front end code as well as any public resource. Express will help exactly with that.
To install Node.JS, you can simply go to Nodejs.org and get the latest version. For this tutorial, we need support for certain elements of EcmaScript7 (ES7) so I recommend the 8.2.1 version or higher if exists when you read this.
After Node is installed in your local environment, we will create a project structure using Express generator, but before that, we need to pick a template engine. Express uses different types of engines to generate HTML files on the fly before sending them as part of the response, this allows to create HTML content dynamically on each call to the server. In this tutorial, we will use Handlebars, a simplistic template engine that leverages actual HTML instead of developing its own template language.
First install express generator run
npm install express-generator -g
Now create a project called dbximgs using handlebars template engine
express --hbs dbximgs
This creates a folder called dbximgs with the structure below. Notice, the dependencies of the project are not yet installed, only a file structure has been created.
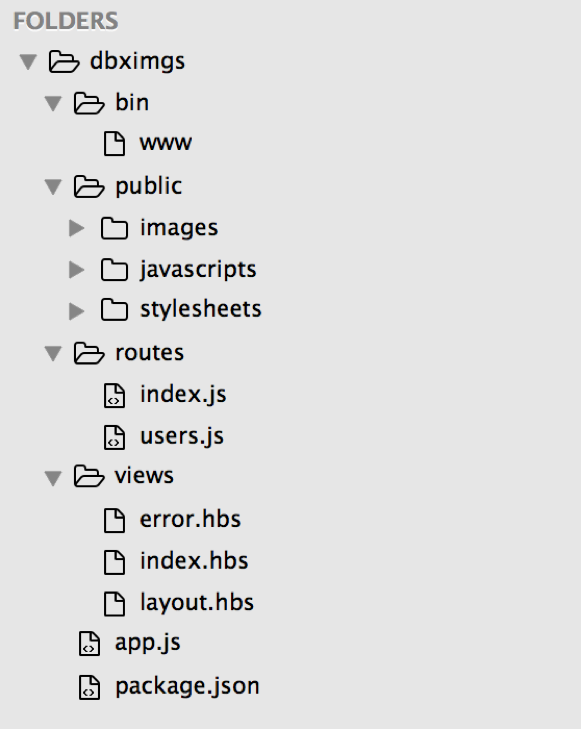
These are the main items to highlight on that structure
- package.json lists the dependencies to be installed and general info on the project. Also declares the entry point of the app, which is the bin/www file.
- bin/www is the file that declares the port and actually gets the server running. You won’t need to modify it in this sample.
- app.js middleware libraries get initialized on this file. Think about middleware libraries like code that gets raw texts requests from the Web, transforms them and then formats them nicely.
- routes/index.js this code gets executed when you hit an endpoint on the server.
- public folder: is the front end or resources and files that will eventually find their way to the user. Never store any critical code here, as it could be accessed by users via their browser, that is what the back end is for.
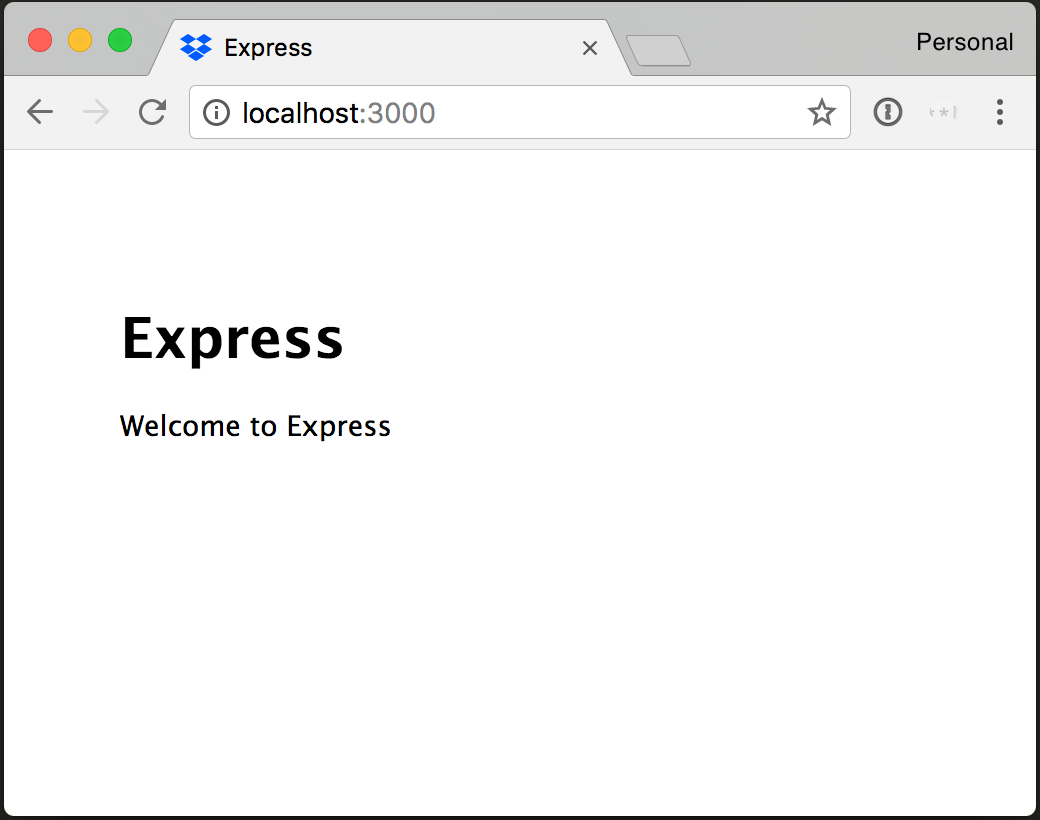
At this point, you can get your minimal Web Service running locally. First you actually need to install the dependencies declared on your package.json using the npm install command
cd dbximgs
npm install
Once the installation is complete, run
npm start
Go to your browser and enter http://localhost:3000 on the address bar and you will see your server running:
2. Front end and back end
Before continuing with the code, it is important to set some additional structure to our project to have a clean separation of responsibilities.
Back end In general, anything that is not in the public folder constitutes the back end. Whenever you make a change to the back end, you need to restart the server to see it. The main files that we will modify are:
- app.js to setup the middleware or code that handles the requests before they reach our router.
- routes/index.js will contain all the endpoints of our server.
Additionally, create the following two files for the back end at the root folder of the project.
- config.js will contain all the configuration variables, paths, secrets, etc.
- controller.js will contain all the business logic and implementation of the routes.
Front end Defined as anything that lives in the public folder. The user and the user’s browser will interact with and it is normally HTML, CSS, JavaScript and images contained there. You don’t need to restart the server to see changes on it.
A bit of front end work with Galleria
We will be using a JavaScript library called Galleria. This library uses jQuery and will allow us to add images on the fly and display them nicely.
We will keep the front end development as simple as possible as the main topic of the tutorial is the back end end part. So let us set a page that properly renders Galleria.
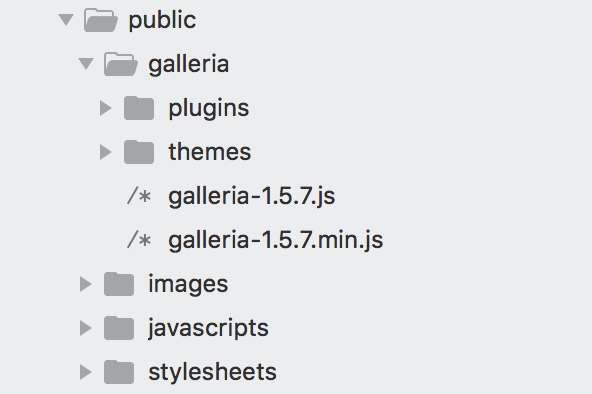
First download the Galleria library from this link and uncompress it.
Now copy the galleria folder inside the /public folder and it should look like this
Our first exercise is to put a simple template page running using handlebars. If you want to know more about how to use handlebars, here is a good resource.
A template generates HTML code on the fly before it gets sent to the client. Our first exercise will receive a request on the home endpoint / , package the path of several images on an array and pass it to a handlebars template.
- First put any three images in the /public/images folder, you can call them a.jpg*, *b.jpg and c**.jpg for simplicity.
- Add the route: in the routes/index.js file, replace the router.get method with the following code.
routes/index.js
//first add the reference to the controller
var controller = require('../controller');

/* GET home page. */
router.get('/', controller.home);
- Add the controller: add the implementation of the endpoint in the controller. If you haven’t, create a controller.js file at the root level and add the following code.
controller.js
module.exports.home = (req,res,next)=>{
  var paths = ['images/a.jpg','images/b.jpg','images/c.jpg'];
  res.render('gallery', { imgs: paths, layout:false});
};
The res.render gets two arguments: the first is the name of the template (which we have not created yet) and the second is a JSON object that will be passed to the template engine. In this case, we will pass our paths array as imgs and the layout:false will ensure that handlebars doesn’t use the template layout.
Now create the template /views/gallery.hbs and copy this code
/views/gallery.hbs
<!DOCTYPE html>
<html>
<head>
      <script type='text/javascript' src='https://ajax.googleapis.com/ajax/libs/jquery/1.11.1/jquery.min.js'></script>
      <script src="/galleria/galleria-1.5.7.min.js"></script>
      <script type='text/javascript' src='/javascripts/page.js'></script>
      <link rel="stylesheet" href="/stylesheets/page.css">
</head>
<body>
      <div class="galleria">

        {{#each imgs}}
            <img src="{{this}}">
        {{/each}}

      </div>
</body>
</html>
You can see in the body part that we iterate through the imgs object passed creating HTML code with an image tag per array element. Let’s now add the css and JavaScript file referenced in the header above.
public/javascripts/page.js
 jQuery(document).ready(function(){
      Galleria.loadTheme('/galleria/themes/classic/galleria.classic.min.js');
      Galleria.run('.galleria');
});
public/stylesheets/page.css
.galleria{
    max-width: 100%;
    height: 700px;
    margin: 0 auto;
}
🎯 The source code at this point can be found in this link
Now let us run the server with
npm start
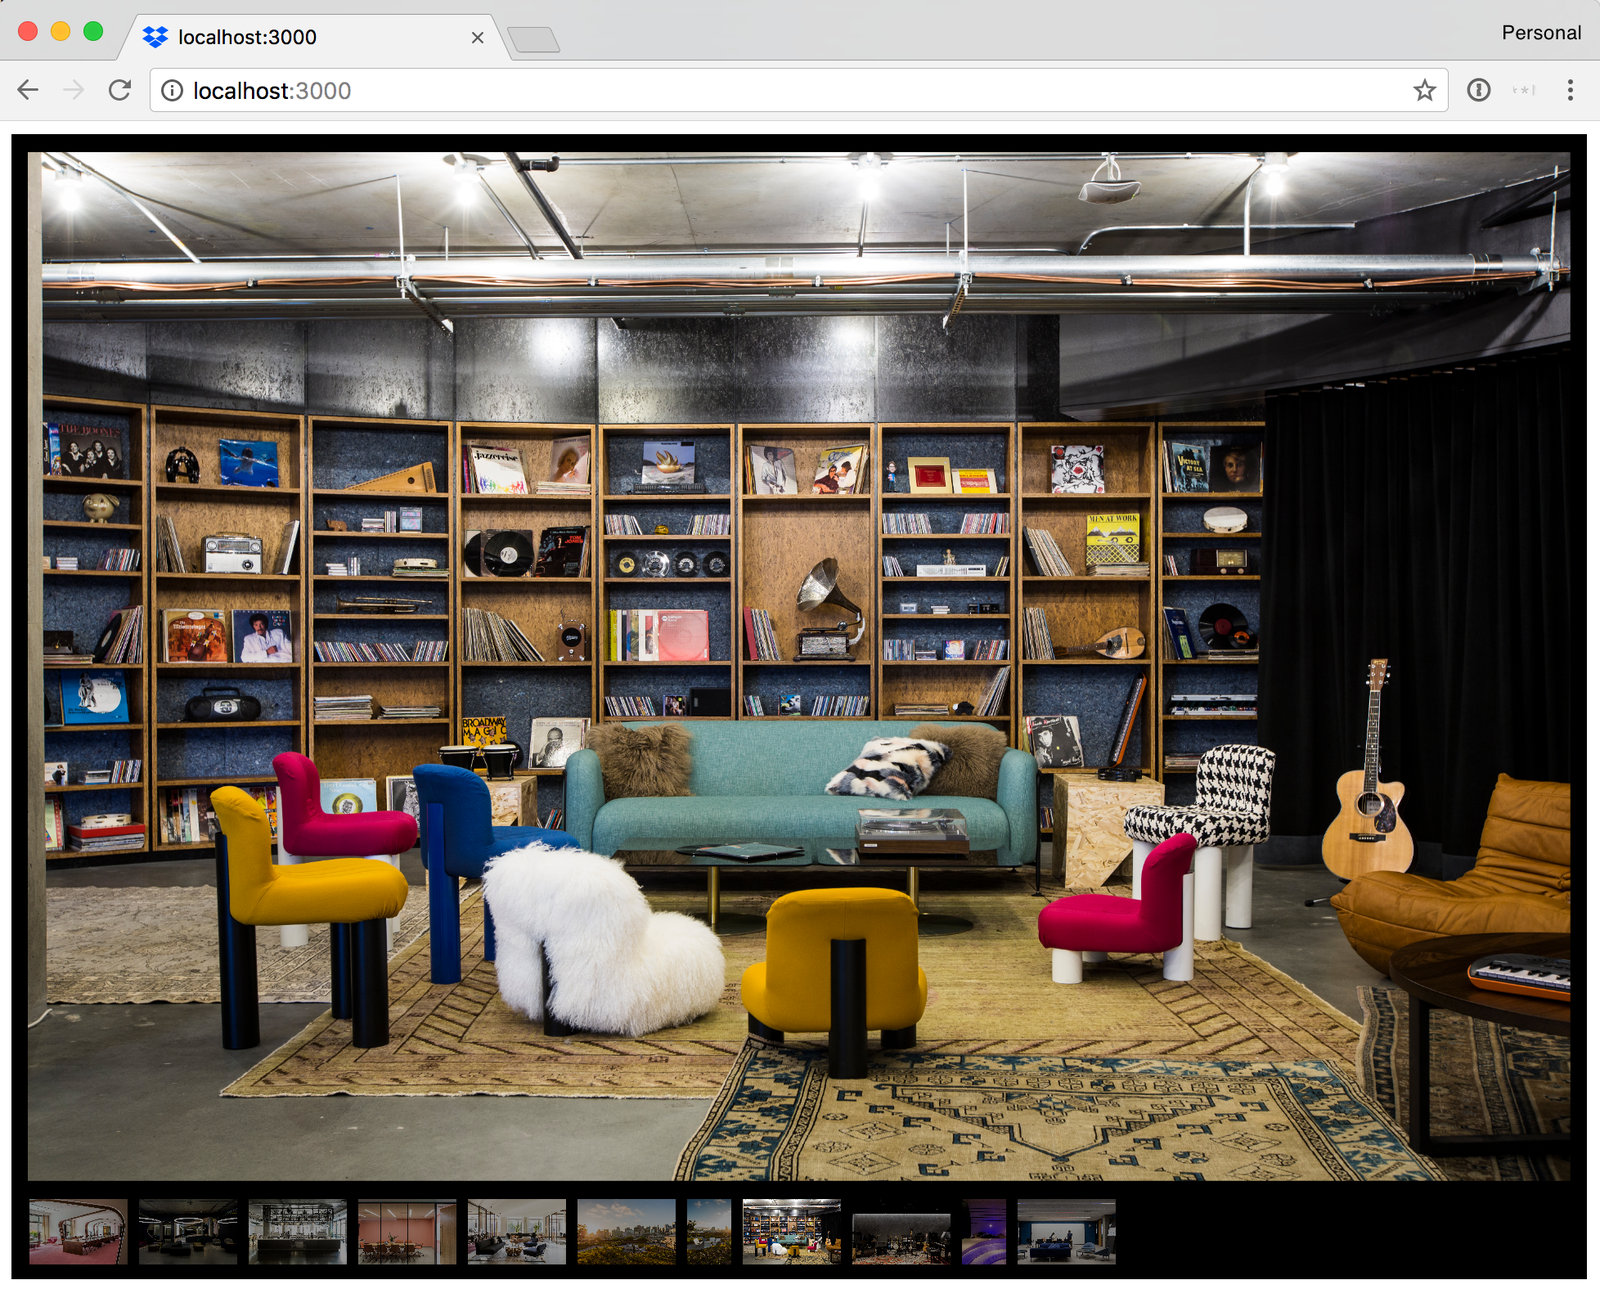
And in your browser navigate to http://localhost:3000 and it will look like this

Now that we have our front end running. Let us do the back end part, which is the main focus of this tutorial.
3. Dropbox app
We want to access the Dropbox folder of a user who authorizes the middleware to read it and populate a gallery.
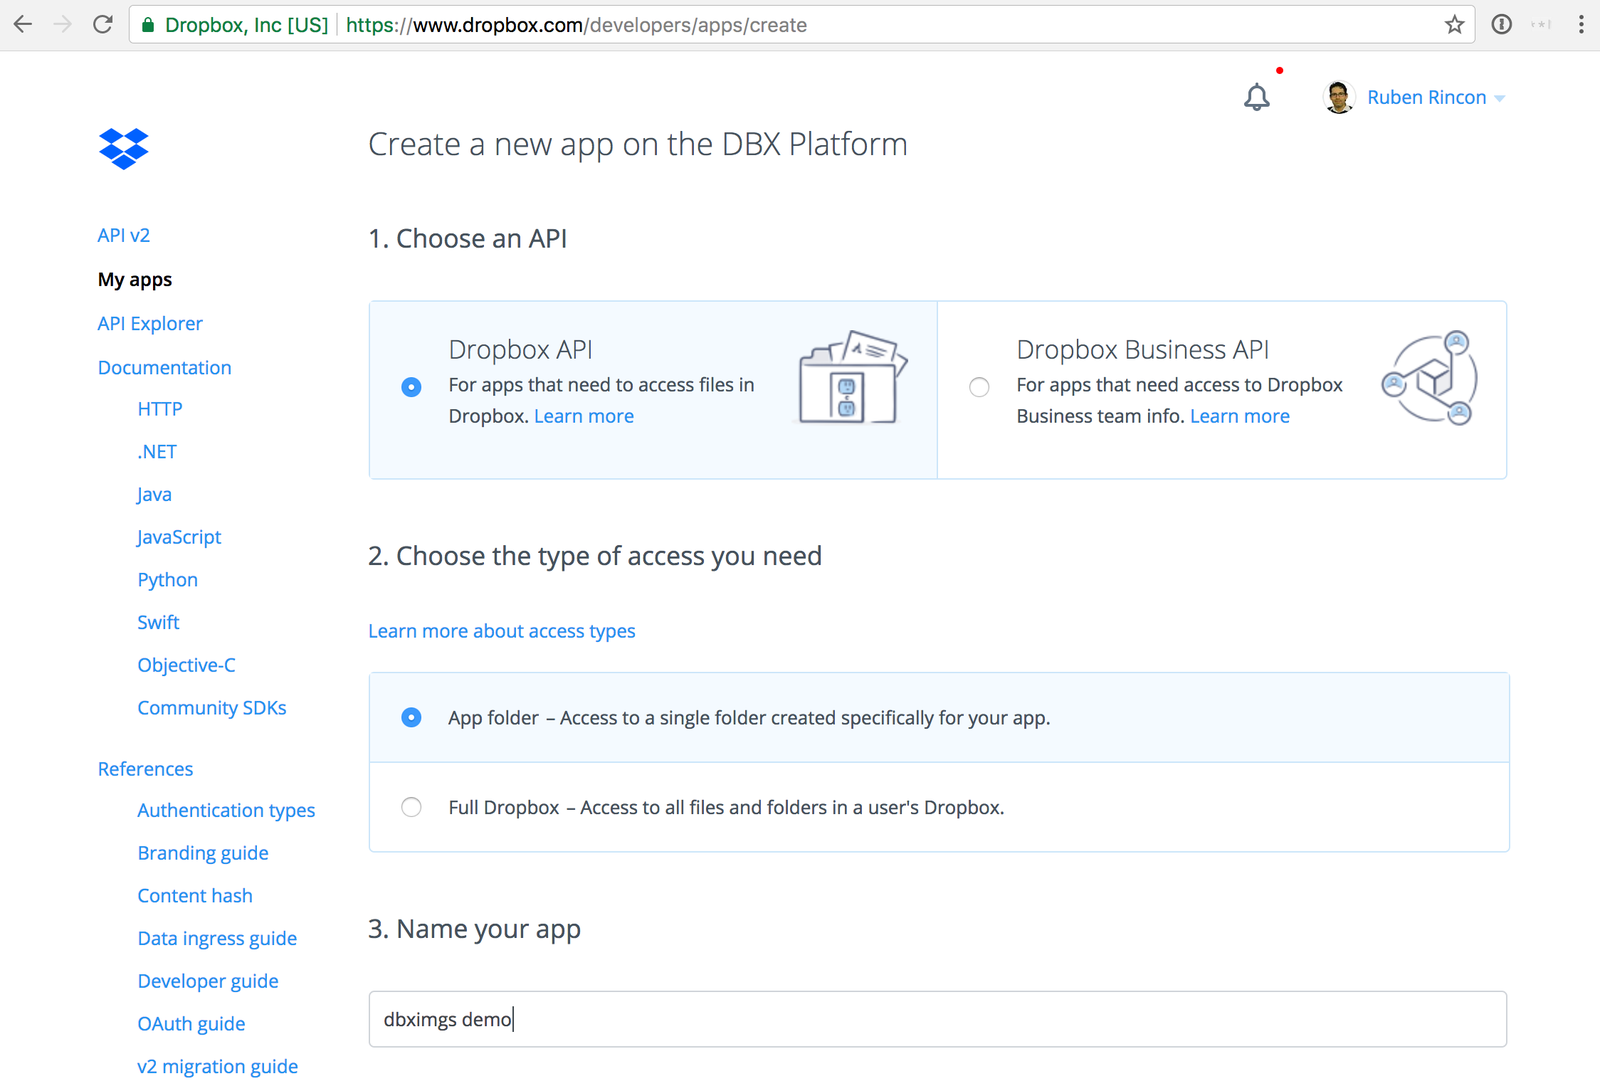
To do this, we will first need to create a Dropbox app. For that you need a Dropbox account. If you don’t have one, create one first and then go to https://www.dropbox.com/developers/apps And click on Create App
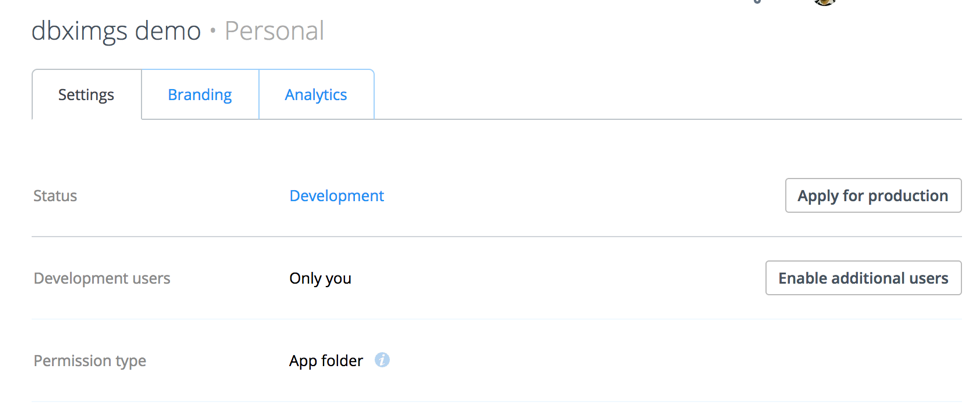
Then choose Dropbox API, App Folder, put a name on your app and click on Create App.
We chose App folder permission so the middleware can only read and write to a single folder to those users who authorize the app.
After this, you want to also enable additional users in this app, otherwise only you can use it. In the settings page of your app you will find a button to do this.
4. OAuth with authorization code grant flow
This application should be able to read a specific app folder for any Dropbox user who consents. For this we need to build an authentication flow where user is redirected to Dropbox to enter credentials and then authorize this app to read users Dropbox. After this is done, a folder inside Dropbox will be created with the name of this app and the middleware will be able to access the contents of that folder only.
The most secure way to do this is using an authorization code flow. In this flow, after the authorization step, Dropbox issues a code to the middleware that is exchanged for a token. The middleware stores the token and is never visible to the Web browser. To know who is the user requesting the token, we use a session. At first, we will simply use a hardcoded session value and save it in a cache, but later we will replace it with a proper library to manage sessions and cookies and will be stored on a persistent database.
Before writing any code, we need to do an important configuration step in Dropbox:
Pre-register a redirect URL in the Dropbox admin console. Temporarily we will use a localhost endpoint which is the only permitted http URL. For anything different to home, you need to use https. We will use a /oauthredirect endpoint. So enter the URL http://localhost:3000/oauthredirect and press the Add button.
Also we we will not use implicit grant, so you can disable it.

💡 If you are interested in learning more about OAuth, this is a good read 👍
The whole authorization flow will have all the following steps which I will explain right after.
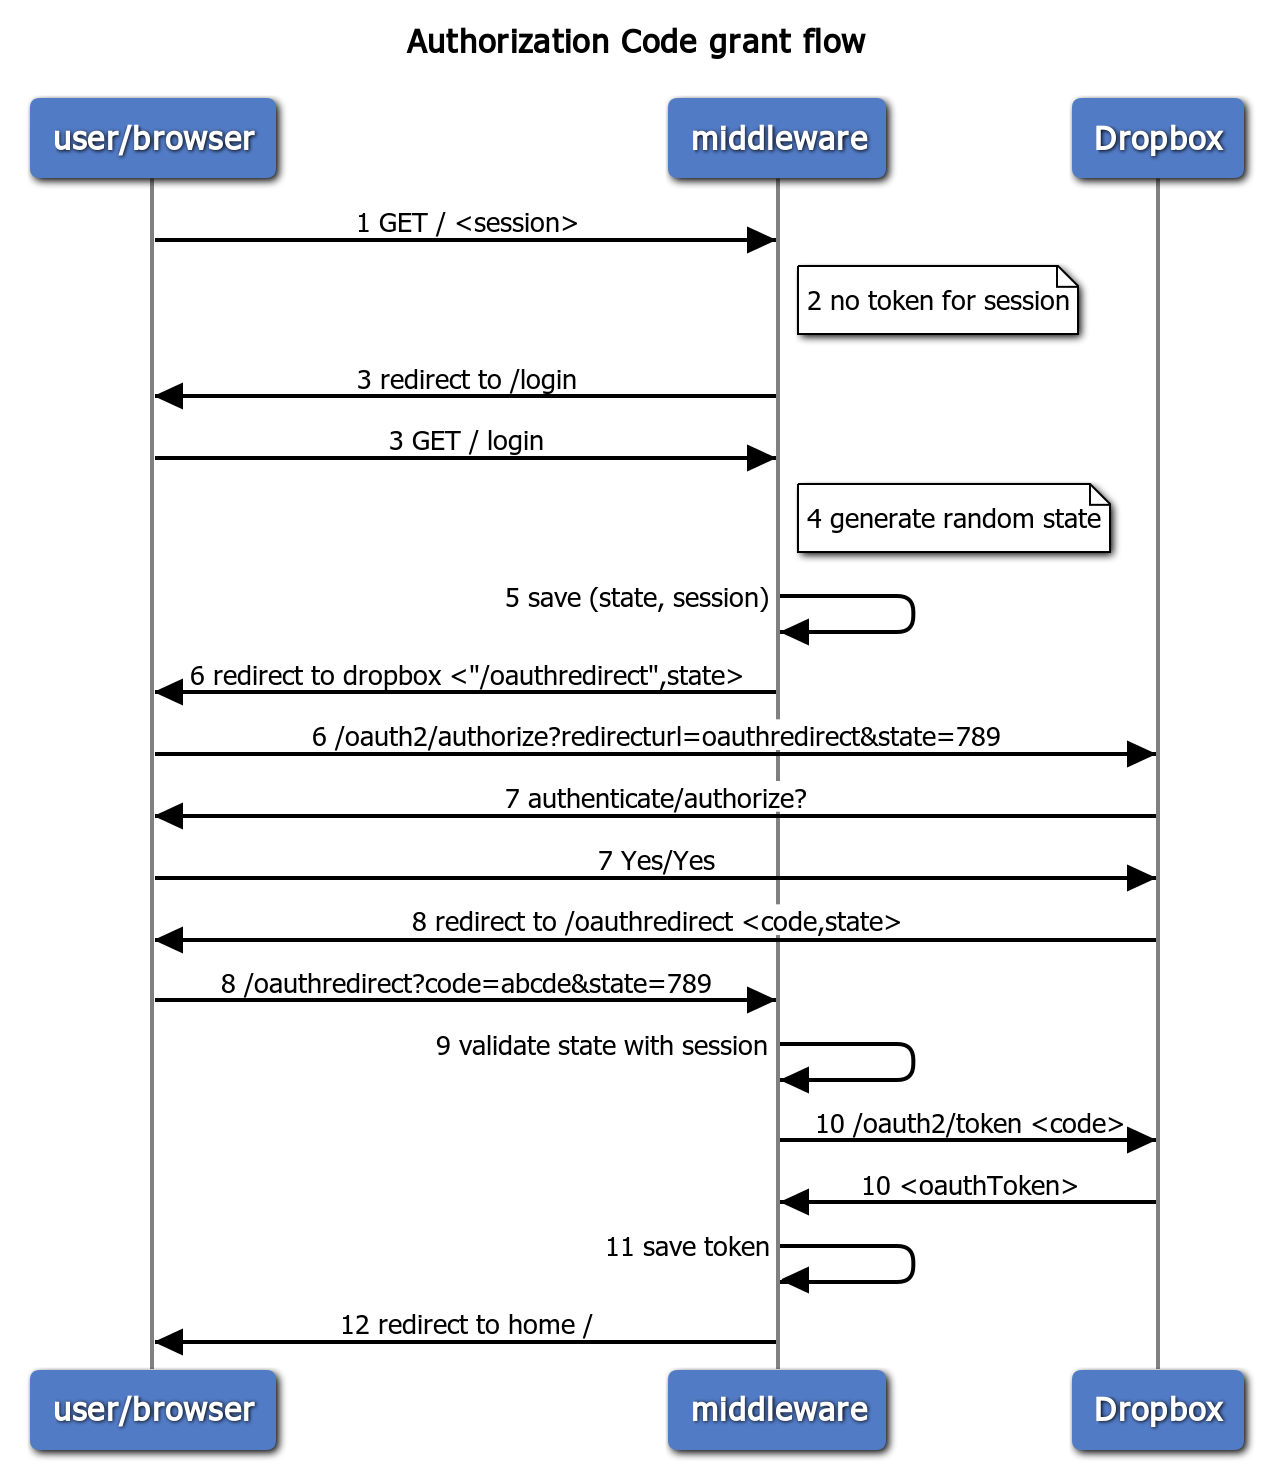
- When a user calls the home
/endpoint, the middleware retrieves a session for that specific user. (we will first use a hardcoded value and a cache, but later we will use a proper library). - The middleware checks if there is an OAuth token already issued for that session. In this case, it does not find any, so an authorization sequence is started.
- The middleware redirects to a
/loginendpoint which will construct a URL to perform the authentication via Dropbox. - Part of this URL is a state, which is a set of characters that will be passed to Dropbox and will be visible in the browser address bar as part of the URL.
- The state is saved along the session.
- User is redirected to the authentication server in Dropbox along with the state and a URL to redirect back to the middleware, in this case we will use the
/oauthredirectendpoint. - The user will authenticate to Dropbox and authorize this application to read a specific folder.
- Dropbox will redirect the user to the
/oauthredirectendpoint of the middleware and will pass a code and give us back the state we passed. - The middleware validates that there is an existing session for that state, this is a protection against CSRF attacks.
- The middleware makes a POST call to Dropbox to exchange the code for an OAuth token. In this call, the middleware will pass the application key/secret to Dropbox.
- The middleware will save the token along with the session.
- User will be redirected to home
/but now the user will have a token to make calls to Dropbox API.
Let us write all the code now… 👨💻
First we need a number of configuration items in the config.js file at the root level. You will need to replace the appkey/secret from your own Dropbox console.
config.js
module.exports = {
  DBX_API_DOMAIN: 'https://api.dropboxapi.com',
  DBX_OAUTH_DOMAIN: 'https://www.dropbox.com',
  DBX_OAUTH_PATH: '/oauth2/authorize',
  DBX_TOKEN_PATH: '/oauth2/token',
  DBX_APP_KEY:'<appkey_in_dropbox_console>',
  DBX_APP_SECRET:'<appsecret_in_dropbox_console>',
  OAUTH_REDIRECT_URL:"http://localhost:3000/oauthredirect",
}
🛑 ⚠️ If you are using a version control system such as git at this point, remember the Dropbox key/secret will be hard coded in some version of your code, which is especially bad if you are storing it on a public repository. If that is the case, consider using dotenv library along with the .gitignore file explained on section 7.
Now let’s add the business logic. To create a random state we will use the crypto library (which is part of Node) and to temporarily store it in a cache, we will use node-cache library. The node-cache simply receives a key/value pair and an expire it in a number of seconds. We will arbitrarily set it to 10 mins = 600 seconds.
Let us first install the node-cache library
npm install node-cache --save
💡 The --save adds a dependency in the package.json file.
For the steps 1,2 and 3 in the flow above, modify the home method in the controller.js If there is no token, we redirect to the /login endpoint passing a temporary session in the query. Remember we will change this for a session library later.
controller.js
const
crypto = require('crypto'),
config = require('./config'),
NodeCache = require( "node-cache" );
var mycache = new NodeCache();

//steps 1,2,3
module.exports.home = (req,res,next)=>{
    let token = mycache.get("aTempTokenKey");
    if(token){
        let paths = ['images/a.jpg','images/b.jpg','images/c.jpg'];
        res.render('gallery', { imgs: paths });
    }else{
        res.redirect('/login');
    }
}

//steps 4,5,6
module.exports.login = (req,res,next)=>{

    //create a random state value
    let state = crypto.randomBytes(16).toString('hex');

    //Save state and temporarysession for 10 mins
    mycache.set(state, "aTempSessionValue", 600);

    let dbxRedirect= config.DBX_OAUTH_DOMAIN
            + config.DBX_OAUTH_PATH
            + "?response_type=code&client_id="+config.DBX_APP_KEY
            + "&redirect_uri="+config.OAUTH_REDIRECT_URL
            + "&state="+state;

    res.redirect(dbxRedirect);
}
Now we need to list the login endpoint in the routes/index.js , so add the following line.
routes/index.js
router.get('/login', controller.login);
At this point, you can test it again by running
npm start
and hitting http://localhost:3000 should forward to an authentication/authorization page like this

Once you authorize, you will see an error as we have not added an endpoint to be redirected back, but take a look at the url, you will see there the state you sent and the code from Dropbox that you will use to get a token .

Exchanging code for token
When Dropbox redirects to the middleware, there are two possible outcomes:
- A successful call will include a code and a state
- An error call will include an error_description query parameter
In the success case, we will exchange the code by a token via a POST call to the /oauth2/token call in Dropbox. To make that call we will use the request-promise library, which is a wrapper to the request library adding promise capabilities on top of it.
Let us first install the request-promise and request libraries with the following command
npm install request request-promise --save
Now add one more method to the controller with the logic to exchange the code via the Dropbox API. Once the token is obtained we will temporarily save it on cache and redirect to the home path.
controller.js
//add to the variable definition section on the top
rp = require('request-promise');

//steps 8-12
module.exports.oauthredirect = async (req,res,next)=>{

  if(req.query.error_description){
    return next( new Error(req.query.error_description));
  }

  let state= req.query.state;
  if(!mycache.get(state)){
    return next(new Error("session expired or invalid state"));
  }

  //Exchange code for token
  if(req.query.code ){

    let options={
      url: config.DBX_API_DOMAIN + config.DBX_TOKEN_PATH,
          //build query string
      qs: {'code': req.query.code,
      'grant_type': 'authorization_code',
      'client_id': config.DBX_APP_KEY,
      'client_secret':config.DBX_APP_SECRET,
      'redirect_uri':config.OAUTH_REDIRECT_URL},
      method: 'POST',
      json: true }

    try{

      let response = await rp(options);

      //we will replace later cache with a proper storage
      mycache.set("aTempTokenKey", response.access_token, 3600);
      res.redirect("/");

    }catch(error){
      return next(new Error('error getting token. '+error.message));
    }
  }
}
The beauty of using the request-promise library and ES7 async await is that we can write our code as if it was all synchronous while this code will not actually block the server. The await indicator will simply yield until the rp(options) call has a returned a value (or error) and then it will be picked up again. Notice that the function has to be marked async for this to work. If the promise fails, it will be captured by the catch and we pass it to the app to handle it, so it is pretty safe.
💡 If you have any questions on how the options for the request are formed, you can check the request documentation. 💡 If you wan to know more about async await this is a good source
Now we need to hook the route to the controller in the routes/index.js file.
routes/index.js
router.get('/oauthredirect',controller.oauthredirect);
and run the server again with npm start and try again http://localhost:3000
You should see again the gallery with the mock images displaying correctly.
5. Fetching images from Dropbox
Now that we are able to see a gallery of images. We want to read the images from Dropbox. After the user authorizes the application to read a folder in Dropbox, a folder will be created within the Apps folder with the name of this app, in this case dbximgs demo. If the Apps folder didn’t exist before, it will be created. So go ahead and populate that folder with some images you want. For security purposes we will use temporary links that are valid only for 4 hours.
Now we need to make a call to the Dropbox API to fetch temporary links for those images. We will follow these steps:
- Call Dropbox
/list_folderendpoint which returns information about the files contained in the App/dbximgs demo - Filter the response to images only, ignoring other types of files and folders
- Grab only the
path_lowerfield from those results - For each
path_lowercall theget_temporary_linkendpoint, this link is valid for 4 hours. - Grab the
linkfield of the response - Pass all the temporary links to the gallery
💡 More information about these endpoints in the Dropbox documentation
First, you need to add a couple configuration fields
config.js
DBX_LIST_FOLDER_PATH:'/2/files/list_folder',
DBX_LIST_FOLDER_CONTINUE_PATH:'/2/files/list_folder/continue',
DBX_GET_TEMPORARY_LINK_PATH:'/2/files/get_temporary_link',
This is the code you need to add to controllers.js
controller.js
/*Gets temporary links for a set of files in the root folder of the app
It is a two step process:
1.  Get a list of all the paths of files in the folder
2.  Fetch a temporary link for each file in the folder */
async function getLinksAsync(token){

  //List images from the root of the app folder
  let result= await listImagePathsAsync(token,'');

  //Get a temporary link for each of those paths returned
  let temporaryLinkResults= await getTemporaryLinksForPathsAsync(token,result.paths);

  //Construct a new array only with the link field
  var temporaryLinks = temporaryLinkResults.map(function (entry) {
    return entry.link;
  });

  return temporaryLinks;
}


/*
Returns an object containing an array with the path_lower of each
image file and if more files a cursor to continue */
async function listImagePathsAsync(token,path){

  let options={
    url: config.DBX_API_DOMAIN + config.DBX_LIST_FOLDER_PATH,
    headers:{"Authorization":"Bearer "+token},
    method: 'POST',
    json: true ,
    body: {"path":path}
  }

  try{
    //Make request to Dropbox to get list of files
    let result = await rp(options);

    //Filter response to images only
    let entriesFiltered= result.entries.filter(function(entry){
      return entry.path_lower.search(/\.(gif|jpg|jpeg|tiff|png)$/i) > -1;
    });

    //Get an array from the entries with only the path_lower fields
    var paths = entriesFiltered.map(function (entry) {
      return entry.path_lower;
    });

    //return a cursor only if there are more files in the current folder
    let response= {};
    response.paths= paths;
    if(result.hasmore) response.cursor= result.cursor;
    return response;

  }catch(error){
    return next(new Error('error listing folder. '+error.message));
  }
}


//Returns an array with temporary links from an array with file paths
function getTemporaryLinksForPathsAsync(token,paths){

  var promises = [];
  let options={
    url: config.DBX_API_DOMAIN + config.DBX_GET_TEMPORARY_LINK_PATH,
    headers:{"Authorization":"Bearer "+token},
    method: 'POST',
    json: true
  }

  //Create a promise for each path and push it to an array of promises
  paths.forEach((path_lower)=>{
    options.body = {"path":path_lower};
    promises.push(rp(options));
  });

  //returns a promise that fullfills once all the promises in the array complete or one fails
  return Promise.all(promises);
}
Finally, modify again the home method in the controller.js to look like the code below. First of all, you will notice we added an async modifier as we use an await call to get the links from Dropbox from the code above.
controller.js .home method
//steps 1,2,3
module.exports.home = async (req,res,next)=>{
  let token = mycache.get("aTempTokenKey");
  if(token){
    try{
      let paths = await getLinksAsync(token);
      res.render('gallery', { imgs: paths, layout:false});
    }catch(error){
      return next(new Error("Error getting images from Dropbox"));
    }
  }else{
  res.redirect('/login');
  }
}
You can run the server and test it. You should be able to see the images from the folder in your gallery after login into Dropbox.
👁️ Make sure you have images in the folder created after you login to Dropbox and authorize the application.
🎯 The source code at this point can be found in this link
6. Cookies, sessions and Redis database
Until now, we use a hardcoded session in the /login endpoint. We are going to make several changes for the sake of security and it comes with three Web dev components: cookies, sessions and a session store.
Cookies: data stored as plain text on the users browser. In our case it will be a sessionID. Session: set of data that contains current status of a user as well as a token to access Dropbox resources. Identified via sessionID. Session store: where sessions are stored. We use Redis as this is a fast, lean and popular key value storage.
Our new flow will be something like this:
- When a user hits our main server endpoint
/for the first time, a session gets automatically created and a sessionID gets stored via cookies in the browser. We check if the session has a current token. - If there is no token, we redirect to the
loginendpoint, we create a random state value and store the sessionID in cache with the state as key. - When we get redirected back, we find in the cache a SessionID for that state and compare against the current sessionID. This indicates we originated that authentication flow.
- When the OAuth flow is complete, we regenerate the session (creating a new sessionID) and store the token as part of the new session.
- We redirect back to our main endpoint
/. - As a token is found in the current session, the gallery data is returned using the token.
Installing redis To test this locally, you need to install Redis in your machine which can be obtained here
Once you unpack redis on your local machine, just go to the redis folder and run.
src/redis-server
You don’t need to worry about configuration as this is only a local test instance, the production one will be using Heroku. When it runs, it will look like this:

We will also need the following Node libraries
express-session: Node library to manage sessions express-sessions: Node library that wraps the session store redis: Node library to manipulate redis
so run the following commands:
npm install express-sessions express-session redis --save
You need to add a sessionID secret in the config file (This is the secret used to sign the session ID cookie). Pick your own.
config.js
SESSION_ID_SECRET:'cAt2-D0g-cOW',
And now initialize the libraries in the app.js file where any middleware gets configured with the following configuration. Simply add the code below right after the initialization of the app variable. var app = express();
app.js
var config = require('./config');
var redis = require('redis');
var client = redis.createClient();
var crypto = require('crypto');
var session = require('express-session');

//initialize session
var sess = {
    secret: config.SESSION_ID_SECRET,
    cookie: {}, //add empty cookie to the session by default
    resave: false,
    saveUninitialized: true,
    genid: (req) => {
            return crypto.randomBytes(16).toString('hex');;
          },
    store: new (require('express-sessions'))({
        storage: 'redis',
        instance: client, // optional
        collection: 'sessions' // optional
    })
}
app.use(session(sess));
Finally, we will make 5 changes in the controller: 1 in the login method, 1 in the home method, 2 in the oauthredirect method and we will also add a new method to regenerate a session.
- We save now in the cache the sessionID instead of a hardcoded value.
controller.js login method
// mycache.set(state, "aTempSessionValue", 600);
mycache.set(state, req.sessionID, 600);
- Instead of reading the token from cache, read it from the session.
controller.js home method
//let token = mycache.get("aTempTokenKey");
let token = req.session.token;
- In the oauthredirect, now we actually make sure that the state value we have just received from Dropbox is the same we previously stored.
controller.js oauthredirect method
//if(!mycache.get(state)){
if(mycache.get(state)!=req.sessionID){
- For security reasons, whenever we get a new token, we regenerate the session and then we save it. Let us use a method called regenerateSessionAsync that receives the request.
controller.js oauthredirect method
//mycache.set("aTempTokenKey", response.access_token, 3600);
await regenerateSessionAsync(req);
req.session.token = response.access_token;
- Now we implement the regenerateSessionAsync method. This method simply wraps the generation of the session in a Promise. We do this because we don’t want to mix awaits and callbacks. If we had to do this more often we would use a wrapping library, but this is the only time, so we do it in the rough way. 💡 you can read more about asynchronous calls here
controller.js regenerateSessionAsync method
//Returns a promise that fulfills when a new session is created
function regenerateSessionAsync(req){
  return new Promise((resolve,reject)=>{
    req.session.regenerate((err)=>{
      err ? reject(err) : resolve();
    });
  });
}
And you can now run with npm start.
🎯 The source code at this point can be found in this link
7. Deploying to Heroku
⚠️ While you will not be charged anything for following any of the steps below, provisioning the Redis database addin requires you to have a credit card on file on Heroku. But again, we will be using only free tiers.

- First create a free account at https://heroku.com
- If they ask you about the technology you will be using, select Node.JS
- Then click on Create an App and give it a name. In this specific case, I will call it dbximgs as I was lucky enough to have that name still available.
Once you create the app, you are pretty much given the instructions to put the code there, but don’t do all the steps just yet as you need to make several changes.
-
Install the Heroku CLI and login
heroku login
-
A the root level of your project, initialize a git repository. Make sure you use your own project name. git init heroku git:remote -a dbximgs
-
Now we need to add a .gitignore file at the root level so we don’t upload to Heroku all the libraries or files we want to leave behind for security purposes.
.gitignore
# Node build artifacts
node_modules
npm-debug.log

# Local development
*.env
package-lock.json
- There is information that should not be hardcoded in the source code like the Dropbox client/secret and also the Redis secret. Also, there are items that should be configured for a local test vs server production such as the redirectURL of the OAuth flow. There are several ways to work on this, like the Heroku local command, but to have independence of Heroku for local testing, we will use the dotenv library which is not much different.
This library pushes a set of environment variables when the server starts from a .env file if found. We will have a .env file only in the local environment but we will not push it to Heroku as stated in the .gitignore above. Heroku instead uses configuration variables to feed the same information.
First, let us install the dotenv library
npm install dotenv --save
Then, let us add a .env file to the root of the project .env
DBX_APP_KEY='<appkey_in_dropbox_console>'
DBX_APP_SECRET='<appsecret_in_dropbox_console>'
OAUTH_REDIRECT_URL='http://localhost:3000/oauthredirect'
SESSION_ID_SECRET='cAt2-D0g-cAW'
Finally, replace the whole config file to the code below. Notice how we are reading several variables from the environment (which is loaded at startup from the .env file) config.js
require('dotenv').config({silent: true});

module.exports = {
        DBX_API_DOMAIN: 'https://api.dropboxapi.com',
        DBX_OAUTH_DOMAIN: 'https://www.dropbox.com',
        DBX_OAUTH_PATH: '/oauth2/authorize',
        DBX_TOKEN_PATH: '/oauth2/token',
        DBX_LIST_FOLDER_PATH:'/2/files/list_folder',
        DBX_LIST_FOLDER_CONTINUE_PATH:'/2/files/list_folder/continue',
        DBX_GET_TEMPORARY_LINK_PATH:'/2/files/get_temporary_link',
        DBX_APP_KEY:process.env.DBX_APP_KEY,
        DBX_APP_SECRET:process.env.DBX_APP_SECRET,
        OAUTH_REDIRECT_URL:process.env.OAUTH_REDIRECT_URL,
        SESSION_ID_SECRET:process.env.SESSION_ID_SECRET,
}
Since those variables won’t exist on Heroku, we need to manually add them. So in your app in Heroku, click on Settings and then on Reveal config vars

Then manually add the variables with the proper values

👁️ Notice something important here. We changed the OAUTH_REDIRECT_URL to https://dbximgs.herokuapp.com/oauthredirect. In this field you need to put the name of your app in the following way:
https://<yourappname>.herokuapp.com/oauthredirect
- As we are now using a different redirect URL for the authentication, we need to also add it to the Dropbox app console.

- When you deploy your app to Heroku, it installs all the libraries and dependencies from your package.json file, but the problem we will see is that Node.JS itself might be a version not compatible yet with elements of ES7 we put in our code like the async/await calls. To avoid this, we need to set the Node.JS dependency in the package.json file. For this add the following lines right before the dependencies
package.json
"engines": {
  "node": "~8.2.1"
},
It will look something like this package.json
{
  "name": "dbximgs",
  "version": "0.0.0",
  "private": true,
  "scripts": {
    "start": "node ./bin/www"
  },
  "engines": {
    "node": "~8.2.1"
  },
  "dependencies": {
      //many libraries listed here
  }
}
- We use Redis to store sessions and luckily there is a free Heroku addin that can be configured only with a few steps:

- First, go to the Heroku Redis addin page
- Click on Install Heroku Redis button
- Select your application from the dropdown list
- Choose the free tier and press provision. If you don’t have a credit card on file this will fail, so you will need to add one to continue in the billing settings of your profile.
Now you will see the addin in your app

There is one more step you need to change in your code for Redis to work. You need to add an environment variable when you create the database client in the app.js file. When this runs locally, this value will be empty, but when Heroku calls it, it will add a variable it has added to our config vars when you deployed the plugin.
app.js
//var client = redis.createClient();
var client = redis.createClient(process.env.REDIS_URL);
You can see it yourself in the settings page of the Heroku app if you click on Reveal config vars
- Seems we have all the elements in place to push the magic button. (make sure you are logged to Heroku in your console, otherwise run the
heroku logincommand at the root level of your project.
now run
git add --all
git commit -m "Heroku ready code"
git push heroku master
which will start the deploy and will show you something like this

You can also check the Heroku logs to make sure server is running correctly
heroku logs --tail
Something like this means things are working fine

- You can now go and test your app!! 🤡
If you are not sure of the link, you can start it from the Heroku console using the Open App button. Or run the heroku open command in the console.

It will be something like this
https://<yourappname>.herokuapp.com
👁️ Remember to add some images to the folder if the Dropbox account you are linking is new. Otherwise, you will simply see a sad white page. 🎯 The source code at this point can be found in this link
8. Security considerations and actions
In general, there are a set of security measures we can take to protect our app. I am checking the ones we have already implemented.
Oauth
- 💚 OAuth code flow where token is not exposed to the Web browser
- 💚 Check state parameter on the OAuth flow to avoid CSRF
- 💚 Store token on a fresh session (regenerate the session)
Cookies
- 💚 Cookies: disabling scripts to read/write cookies from browser in the session configuration. By default the HttpOnly attribute is set.
- 💚 Cookies: enforcing same domain origin (default on the session configuration)
- 🔴 Cookies: make sure cookies are transported only via https. 😱 we will fix it later.
Securing headers
- Good information in this blog post, but here is the summary of what we should care about.
- 🔴 Strict-Transport-Security enforces secure (HTTP over SSL/TLS) connections to the server
- 🔴 X-Frame-Options protection against clickjacking or disallowing to be iframed on another site.
- 🔴 X-XSS-Protection Cross-site scripting (XSS) filter
- 🔴 X-Content-Type-Options prevents browsers from MIME-sniffing a response away from the declared content-type
- 🔴 Content-Security-Policy prevents a wide range of attacks, including Cross-site scripting and other cross-site injections
The blogpost above has more security considerations if you intend to go deeper on the topic.
To secure the headers above, we will use the helmet library.
💡 This is a good blog post to read about helmet
npm install helmet --save
And add the following code to the app.js file to set the headers. Notice that we are only allowing scripts from the ajax.googleapi (this is where we find the jQuery library). Another option is to simply copy the file locally, for that, change the reference in the page.js file.
app.js
var helmet = require('helmet');

//Headers security!!
app.use(helmet());

// Implement CSP with Helmet

app.use(helmet.contentSecurityPolicy({
  directives: {
    defaultSrc: ["'self'"],
    scriptSrc: ["'self'","https://ajax.googleapis.com/"],
    styleSrc: ["'self'"],
    imgSrc: ["'self'","https://dl.dropboxusercontent.com"],
    mediaSrc: ["'none'"],
    frameSrc: ["'none'"]
  },

    // Set to true if you want to blindly set all headers: Content-Security-Policy,
    // X-WebKit-CSP, and X-Content-Security-Policy.
    setAllHeaders: true

}));
With this we have secured the headers now 🤠
- 💚 Securing headers
Let us know fix the cookie transport issue. The best thing to do here is to enable http for development purposes and only allow https for production. Development and production can be set with the NODE_ENV env variable. Heroku is by defauld set to production, the local host is development by default. You can modify this behavior following these steps
After the sess variable is initialized (before the app.use) in the apps.js add the following code app.js
//cookie security for production: only via https
if (app.get('env') === 'production') {
    app.set('trust proxy', 1) // trust first proxy
    sess.cookie.secure = true // serve secure cookies
}
It is important to do the trust the first proxy for Heroku as any requests enters via https to Heroku but the direct internal call to our middleware is http via some load balancer.
And we are done! 👊
- 💚 Cookies: make sure cookies are transported only via https
Now you want to push this to heroku
git add --all
git commit -m "security improvements"
git push heroku master
🎯 The source code at this point can be found in this link
Checking dependency vulnerabilities
The great thing about Node.JS is that you usually find a library that does exactly what you want. But it comes to a great cost, libraries get outdated and then you find yourself in 🔥 library hell 🔥 when they have specific vulnerabilities that get patched. Think about it, you have dependencies that have dependencies and suddenly you have hundreds of dependencies and libraries that might be outdated and vulnerable.
A good way to check you are protected against vulnerabilities to specific dependencies in your code is the nsp check command. It will tell you which libraries have been compromised, what are the patched versions, where to find them and the version you have.
so run
nsp check
and you will get a bunch of tables that look like this

As with Heroku we don’t actually push the node_modules package, it makes sense to patch those files that are directly stated in the package.json file by simply changing the version required. But make sure you test in case there were major changes for that dependency. Every time you push your code to Heroku, it runs the npm install command recreating the node_modules folder.
If the vulnerability is in a library within one of your projects dependencies, check if updating the dependency will fix the issue. Otherwise you have three options: accept the risk of keeping it, replace the library for a similar without the vulnerability or finally, patch it yourself and then actually push all the libraries to Heroku yourself.
9. Production and things to do from here
The master branch of this tutorial also includes a method to logout which revokes the token and deletes the session, it also removes some unused files. check it out.
This is an additional list of things to do to make this tutorial fully production material.
- Manage the errors: for this tutorial, all the errors will be propagated to the app.js page that will set the right error code on the http response and display the error template. res.render(‘error’);
You could make that error page look nicer.
- The front end was barely worked, you can make it look much nicer.
- Add app icons to the Dropbox page so the authorization looks better.
- Probably the most important one will be pagination on the images. You can call Dropbox specifying a number of items you want back. Then Dropbox will give you a cursor to iterate. Adding that will just make this tutorial much longer, so that’s a good task for you if you want to extend it.
10. Try it yourself
🤓 After you hit the link, give it a couple minutes since free Heroku instances are dormant by default and need to be restarted.
You can revoke the token and delete the session using https://dbximgs.herokuapp.com/logout
License
Apache 2.0